Wednesday, May 11, 2011

Chocolate Mousse Torte

So this is one of those things I made a while ago but met with rave reviews. Actually Adam said it was horrible as did mom but I think that's because they didn't want anyone else eating it as Adam ate half of it himself.


  • 37 NILLA Wafers, divided
  • 4 (1 ounce) squares BAKER'S Semi-Sweet Chocolate, divided
  • 2 (3.9 ounce) packages JELL-O Chocolate Instant Pudding
  • 2 cups cold milk
  • 3 cups of homemade whipped cream divided
  • 1 (8 ounce) package PHILADELPHIA Cream Cheese, softened
  • 1/4 cup sugar
  • 2 tablespoons cold milk

It's an easy no bake recipe.
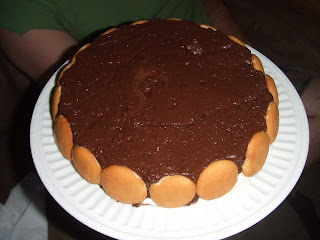
line a 9" round pan with clear plastic wrap
stand up 16 of the wafers around the edge
melt 3 of your chocolate squares
Beat pudding mixes and 2 cups milk with whisk 2 min. Add melted chocolate; mix well. Stir in 1 cup whipped cream; pour into prepared pan.
Beat cream cheese, sugar and remaining milk with mixer until well blended. Stir in 1 cup of the whipped cream then spread over pudding. Top with remaining wafers and cover with plastic wrap again an chill in the fridge for 3 hours.

Remove the top layer of wrap when ready to serve and gently turn out onto your serving dish (I placed my serving dish on top of my torte then flipped so I wouldn't have to worry about it falling out on the floor or anything. Then add the remaining cup (or more of you'd like) of the whipped cream to the top. Take the last square and shave it for decoration on top of the whipped cream. Cut and serve. Yummy!

Catch up

I've still been cooking and exploring my kitchen. Learning new things, cooking with new foods and new seasonings but not been posting. I've been busy with my 9 month old son. Hard to believe he's 9 months now. How time flies. I've just recently started to delve into the world of furniture restoration as well and I figure might as well put that stuff up here on the blog as well. I've done only one piece start to finish and that's the mirror that hangs in my living room. I'll be posting pictures shortly. I also have a second mirror that was donated to me by some wondermus friends of mine, Lesa & Scott (Thank you very much), that I have amazing plans for. That one will end up in my bedroom. Which thanks to some very cheap mis-tinted paint I'm going to finally be able to start working on decorating. My living room/dining room/kitchen all have some semblance of niceness, heck even my hall bathroom is more decorated than my bedroom. I figure I'm more willing to spend money in those other rooms because more people see them. But why not decorate our own inner sanctums? Is it just me or are others like this as well? I need to buy a little fabric but shouldn't be too costly. I've got plans to make a couple of pillows too.

Saturday, May 29, 2010

Mexican Munch

I made this a couple of weeks ago but haven't posted it yet. It was a great dinner. One that made my mom sneeze plenty (she's allergic to corn and this has it aplenty.)
The side dish was a Corn Pudding. It tasted amazing. Even good warmed up and taken to work for leftover lunch. This one could easily be turned into a regular rotation it's so easy to fix and not expensive at all. I think the kids would like this one though when we made it the first time the kids weren't here to test it for me so I'm not sure.

Ingredients:
4 ounces softened cream cheese15-ounce can creamed corn3/4 cup thawed frozen corn
1/2 cup cornmeal
1/2 chopped onion
2/3 cup milk
3 tablespoons butter melted1 egg, beaten
1 tablespoon sugar1/2 cup shredded cheddar
Beat cream cheese, creamed corn, frozen corn, and cornmeal and set aside. In a small pan cook onion in a little oil until tender. Then add to cheese, corn mixture. Stir in milk, melted butter, egg, sugar, and cheddar cheese. Spread in a buttered 1-quart casserole dish and bake 45-50 minutes at 350 degrees. Let stand 10 minutes before serving.


Doesn't that just look so appetizing. The next one of it is in the casserole dish but unfortunately still not cooked. I forgot to take a cooked photo. It was nice and golden brown on top though.


The main part of the meal was some oh so scrumptious creamy chicken enchiladas. These were a snap to make and yummy to boot.

You'll need:
1 can cream of chicken soup
1 can green enchilada sauce1 cup of sour cream
1 cup of salsa
2 cups of cooked shredded chicken
2 cups of grated cheese (I used Monterey Jack)
2 tsp of chili powder
10 6" flour tortillas
1 large tomato, chopped
3 green onions, sliced1 avocado,

Blueberry-Brown Sugar Plain Cake

I love blueberries and this is a really good recipe to throw them in. I took this one from Baking From My Home to Yours by Dorie Greenspan. I got the book less than a year ago when I first started my baking craze and out of the ones I've made only one was I not super sold on. It was good but not my favorite. This one is not that. I love this one. This is the second time I've made it. The first I did it in a loaf pan because that was all I had available. I would not recommend it. The way the batter is you don't want to use a loaf pan because it takes to long to cook the middle and the edges are too tough. The kiddos who shared this seemed to enjoy it as well.

Very simple recipe:
1 1/3 Cups all-purpose flour
2 tsp baking powder
1/2 tsp ground cinnamon
1/8 tsp plus a pinch salt
2 large eggs, separated
1 stick unsalted butter, at room temp
1 Cup (packed, as if there were any other way) light brown sugar
1/2 Cup whole milk
1 pint blueberries fresh if you have them, frozen (but not thawed if you need to go frozen)

Optional:
Confectioners' sugar, for dusting

Preheat the oven to 375 degrees and butter an 11x7" baking pan to set aside.

Whisk together the flour, baking powder, cinnamon and 1/8 tsp of salt in a small bowl and set aside.

Beat the egg whites, together with a pinch of a salt, until they form peaks. Set aside or if you need to use the same bowl, gently scrap the whites into a clean bowl for holding.
Put the butter and sugar in a mixer bowl and beat on medium speed until creamy. Add the egg yolks and beat for 2 minutes. Reduce the mixer speed to low and add half the dry ingredients, then all the milk and then the remainder of the dry stuff.

Switching to a rubber spatula gently fold in the egg whites. The egg whites will deflate because the batter itself is so heavy this is ok just work as gently as you can. Once the egg whites are folded in still working with a light hand fold in the blueberries and scrape the batter into the prepared pan.
Bake for 35-40 min or until golden brown. Let cool but eat warm if possible. You can dust with confectioners' sugar before serving if you'd like.

I don't have my regular pictures of all the steps but I do have a final product picture to share.

Saturday, April 3, 2010

Heavenly White Cake


Yes yes so I know it's been forever since I've posted. I have continued to cook and bake but have been kinda busy in the last few months and haven't updated. A quick personal update I'm now pregnant and moved into a new place about 2 months ago. My mom is moving to Missouri to be near me and her first grandchild. In fact she is temporarily going to be moving in with the boyfriend and I and staying in the baby's room while she finds a job and a place of her own. I told her she had till August then I'd have to kick her out. (Can you guess what month I'm due?)

Anyway onto the food. :D All said and done this cake doesn't really deserve to be on a blog called the ugly dumpling because truth be known it came out BEAUTIFUL. But I'll post it here cause I don't have another food blog anyway.

So this recipe was ganked from Allrecipes.com I was over visiting a friend and we decided we wanted to bake something so we went searching. I had seen a pic of a white fruit filled cake when I was going through one of my cookbooks and so that's what was on my mind. We decided on a simple white cake and then would add some strawberry something in the middle.

The cake recipe is pretty simple
2 3/4c cake flour
4 tsp baking powder
3/4 tsp salt
4 egg whites
1 1/2c sugar
3/4 c butter
1 1/2 c milk (if you look at the one on the actual website it only calls for a cup however per many reviews we opted to try with the extra milk and feel it worked well. Since we've not make the cake w/o the extra half cup we can not comment on if it NEEDS it or not but we liked it)
1 tsp vanilla extract
1 tsp almond extract


You start by sifting the dry ingredients together (again the actual recipe calls to sift 3 times, we did not, we are lazy we sifted once.) Once sifted set aside. In a large bowl beat your egg whites till stiff then add in half a cup of your sugar. Your remaining sugar will be used in a moment. Beat together the whites and sugar till you can achieve soft peaks and set aside.

Cream your butter then add in the remaining cup of sugar till light and fluffy. Then alternate adding your dry ingredients and your remaining milk into the butter/sugar mixture. Beat each addition till smooth. Then stir in your vanilla and almond extracts. Once blended well mix into your meringue and beat thoroughly.


Separate into your cake pans (we used 3 8" you can do that or 2 9" or a 15"x10" square. Bake in your oven at 350 degrees for 30-35 minutes. Once complete transfer to cooling rack for 10 or more min before icing especially if you intend to use whip cream as it will melt the cool whip if the cake is too warm.
Now for ours we layered the cake with strawberry preserves then put on your whipped cream. For the whipped cream we simply used one pint of heavy cream, 2 tablespoons of powdered sugar and aprox 1 tsp of vanilla. On top of the whipped cream we placed sliced strawberries.
On the first layer I accidentally put the sliced strawberries on top of the preserves before I put the whipped cream. Before we got it in the fridge it slid a little on the layer I did the strawberries next to the preserves. On the next layer I did preserves, whipped cream, then the sliced strawberries and that one stayed put where it was supposed to.

After we layered the cake we put it in the fridge for about 20 minutes. Wasn't really needed but decided to do it anyway just so the whipped cream set up well in the layers. After the cake set up and we did the next batch of whipped cream (in which we added 3 tablespoons of the powdered sugar because we wanted the actual icing to be a bit sweeter) we layered strawberries on top to finish off what we had. We put the entire cake in the fridge for about 30 minutes to let the whole thing set up. Then we dug in and wow was it great. Not to sweet. Very moist. Very good. All in all a great cake to take to your 4th of July get together or any kind of summer bbq for that matter. You will want some place cool to keep it though if you do decide to do a whipped cream frosting because in the heat it will melt.

Monday, September 14, 2009

Easy peasy cobbler

In the last 3 days I've made 2 cobblers. It's a VERY easy recipe in fact I don't measure anything at all. Unfortunately I don't have pictures but I did want to post about it. I am going to make another one for a BBQ I'm going to this weekend so hopefully I'll have pictures to post then.

For this I've just been using the pre made pie crusts because I've not wanted to spend the time on a home made one.

I did use fresh peaches today in the past I've just used a bag of frozen ones, they work great but the fresh ones were sooo much better.

I used 4 peaches peeled and wedged. Then I added a pint of blueberries. One I made I used blackberries because generally I like blackberries better than blue but for the cobbler I like the blueberries better so I went back to them today for the one I made. Then I added in aprox 3/4 cup of brown sugar, the brown sugar over the white gives it a much richer flavor I think. And I added 2 tbls of butter.

Mix the fruit, sugar, and butter in a bowl just to make sure that your fruit is dusted with sugar. The peaches I used today were so juicy that the brown sugar started to dissolve right on the fruit. Place a pie crust in the bottom of your baking dish. I like a deep round dish but today I was baking at a friends so I used what they had which ended up being a 9" square pyrex dish and that worked great as well. Pile your fruit mix into the pie crust. Place another pie crust on top and add a couple of slices into the top of the pastery to allow it to breath. Place in a preheated oven at 350 degrees and bake for aprox 45 min.

It will be extreamly juicy and extreamly good! Enjoy

Wednesday, September 9, 2009

Rum-Drenched Vanilla Cake

Oh My God I LOVE this recipe. This one will defiantly make it into a regular rotation. Birthdays, pot lucks, no reason at all other than it's damn good. Again I made this one on my vacation. It is so good the first cake didn't last a day. There were two loafs made from the batter. I'm working on the second one now. Trying to see if I can manage to save a slice for The Brother and The Sister. The Boyfriend gets a slice tonight.


This one is very easy to make. I didn't use anything other than a hand whisk to mix it all. This one is like a pound cake very dense very yummy. And the smell while cooking is to die for. You don't have to use the rum in this recipe if you want to you can just have a yummy vanilla cake if you so desire or you can even use rum extract, not the same flavor exactly but still good.


Ingredients:
2 2/3 cup all purpose flour
2 1/2 tsp baking powder
2 1/3 cup sugar
2 plump, moist vanilla beans, split lenghtwise, seeds scraped out and reserved, or 1 1/2 tbl pure vanilla extract
6 large eggs, preferably at room temperature
2/3 cup heavy cream
2 1/2 tbl dark rum
1 stick plus 7 tbl (15 tbl) unsalted butter, melted and cooled

for the syrup:
1/3 cup water
1/4 cup sugar
1/4 cup dark rum


sift the flour baking powder and salt together in a small bowl. Add the sugar and the pulp from the vanilla beans and mix well in a large bowl until the sugar is moist and imbued with the fragrance of vanilla. If you're using the vanilla extract (as I did) add it to the mixture after you add in the eggs.
With the sugar add in eggs and whisk into the sugar until thoroughly mixed, then add in the extract if using that, then the cream, followed by the rum. Once all are mixed well slowly add in the flour mixture in 3 or 4 parts. Make sure it's well mixed between each addition of the flour mixture. Then fold in the melted butter in 2 or 3 parts. The mixture will be smooth and thick.
Then divide the mixture into 2 9 inch loaf pans. Bake at 350 for 55 or 60 min. Again I sprayed the pans with pam didn't butter or powder the pans. If they start to brown too quickly cover them lightly with a foil tent.


While the cakes are in the oven make the syrup so that it can cool down while the cakes finish baking. In a sauce pan mix the water and the sugar over medium heat and bring to a boil. Once it starts to boil remove from the heat and mix in the rum. It will look pretty much like clear liquid, at least it did to me. Set aside and once the cakes are done let them cool for about 5-10 minutes. Then poke holes all over the top of the cake with a thin skewer, or do like I did and just make a few slices into the cake I went about half way down into the cake. Gently brush the syrup onto the top be sure to go slowly so that the cake can sop it up.

Wait if you can or eat it warm it is SO delicious. In fact...I'm gonna go have another small slice. Enjoy!